
How to calibrate 3D resin printer?
W tym poradniku przedstawię krok po kroku jak skalibrować drukarkę żywiczną 3D. Całą procedurę przedstawię na przykładzie posiadanej przeze mnie drukarki Mars 3 PRO firmy ELEGOO. Będzie to prosta instrukcja typu "krok po kroku", która powstała na moich osobistych doświadczeniach. Jestem całkowicie nowy w tematyce 3D więc podzielę się z Wami moimi doświadczeniami podążając tą ścieżką od początku. Mam nadzieję, że przyda się to głównie osobą nowym (tak jak ja) w tym obszarze naszego hobby. Procedurę kalibracji przeprowadziłem z pomocą doświadczonej osoby, także nie obawiajcie się, jest to prawidłowa metoda :)
Please remember that all of this I give you for free. It would be so nice if you leave a mark in the form of comment and share the guide to your friends. If you want to buy me a coffee or a beer the "DONATE" button is below.
Pamiętajcie, że wszystko to daję Wam całkowicie za darmo. Będzie mi więc miło jeśli pozostawicie po sobie ślad w postaci komentarza i udostępnicie ten poradnik znajomym. Jeśli chcecie postawić mi kawę lub piwo przycisk "DONATE" znajduje się poniżej.
The guide assumes that if you are reading it, you have general knowledge of the 3D printing process on a resin printer. You have purchased your first printer and are planning to start printing. I also assume that you have already installed e.g. Lychee Slicer software, you have already added your printer, resin in it and you can configure the basic parameters.
Poradnik zakłada, że jeśli go czytasz to posiadasz ogólną wiedzę o procesie wydruku 3D na drukarce żywicznej. Zakupiłeś swoją pierwsza drukarkę i planujesz rozpocząć drukowanie. Zakładam również, że masz juz zainstalowane np. oprogramowanie Lychee Slicer, dodałeś już w nim swoją drukarkę, żywicę i potrafisz dokonać konfiguracji podstawowych parametrów.
You can read about miniature printing in general here on my blog:
Ogólnie o drukowaniu figurek przeczytasz tutaj na moim blogu:
After purchasing a resin printer, we must calibrate it in order to obtain a correct printout. Each machine is different and has its own soul :) Print quality also depends on the type of resin used, ambient temperature, etc. The following procedure should be performed after purchasing a new printer and after changing the resin to another one.
Po zakupie drukarki żywicznej musimy przeprowadzić jej kalibrację w celu uzyskania poprawnego wydruku. Każda maszyna jest inna i ma swoją duszę :) Jakość wydruku zależy również od rodzaju użytej żywicy, temperatury otoczenia etc. Poniższą procedurę powinniśmy wykonać po zakupie nowej drukarki oraz po zmianie żywicy na inną.
1. FIRMWARE UPDATE
Check if there is new firmware update for your printer available on manufacturer website. Follow the instruction from your manufacturer and update firmware in your 3D printer. For ELEGOO you can check this here.
Sprawdź, czy na stronie producenta dostępna jest nowa aktualizacja oprogramowania sprzętowego dla Twojej drukarki. Postępuj zgodnie z instrukcjami producenta i zaktualizuj firmware w swojej drukarce 3D. W przypadku ELEGOO możesz to sprawdzić tutaj.
 |
| ELEGOO support web page. |

2. LEVELING
After placing the printer in its final location, we need to level it. To do this, follow the manufacturer's instructions. Manufacturers also often post instructional videos on YouTube or their website. For example, for ELEGOO Mars printers you will find such video instructions here. The procedure is simple and well described, so I see no point in duplicating it in my guide.
Po ustawieniu drukarki w docelowym miejscu musimy przeprowadzić jej poziomowanie. W tym celu wykonajcie polecenia zawarte w instrukcji producenta. Producenci często zamieszczają również filmy instruktażowe na YouTube lub swojej stronie internetowej. Na przykład dla drukarek z serii Mars firmy ELEGOO taką video instrukcje znajdziecie tutaj. Procedura jest prosta i dobrze opisana wiec nie widzę sensu powielać jej w moim poradniku.

3. CHECK RESIN SETTINGS
Now we need to check the resin settings that will work on the print. You will find them on the manufacturer's website for sure. For ELEGOO Resin, you can retrieve them here.
 |
| Elegoo Support web page. |
The ELEGOO company has created a special tabular list of parameters that we must set. We are interested in two parameters here: Normal Exposure (s), Layer Height (nm). In the example below, I have marked the line for my printer and Elegoo Standard Resin Gray. These are my output parameters for a layer thickness of 0.50nm.
Firma ELEGOO, stworzyła specjalne tabelaryczne zestawienie parametrów jakie musimy ustawić. Interesują nas tutaj dwa parametry: Normal Exposure (s), Layer Height (mm). Na poniższym przykładzie zaznaczyłem linię dla mojej drukarki i żywicy Elegoo Standard Resin Grey. To są moje wyjściowe parametry dla grubości warstwy 0,05mm.
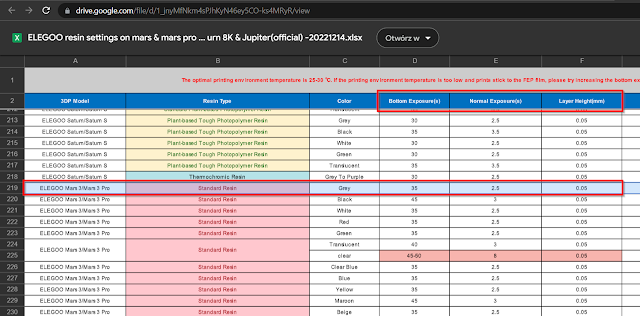 |
| Normal Exposure and Layer Height values for Mars 3 Pro with Standard Resin Grey. |
Now we need to define the printing parameters of our resin in Lychee Slicer (or whatever program you use). We will define two layer thicknesses: 0.50um for less accurate prints (e.g. miniature bases) and 0.30um for more accurate prints (e.g. figurines). The table below shows the comparison of naming in the ELEGOO table and Lychee Slycer.
Teraz musimy zdefiniować parametry wydruku naszej żywicy w programie Lychee Slicer (lub w innym, którego używasz). Zdefiniujemy dwie grubości warstwy 0,50um dla mniej dokładnych wydruków (np. podstawki do figurek) i 0,30um dla bardziej dokładnych wydruków (np. figurki). Poniższa tabelka pokazuje porównanie nazewnictwa w tabeli ELEGOO i programie Lychee Slycer.
|
ELEGOO
TABLE |
LYCHEE SLYCER |
|
Normal
Exposure (s) |
Exposure Time
(s) |
|
Layer Height
(mm) |
Layer Thickness (um) |
For a layer thickness of 0.05mm, the exposure time can be easily read from the table. However, for the layer thickness of 0.03mm, this value is not given. We will have to guess it and choose it ourselves.
Dla grubości warstwy 0,05mm czas ekspozycji możemy łatwo odczytać z tabelki. Natomiast dla grubości warstwy 0,03mm ta wartość nie jest podana. Będziemy musieli ją odgadnąć i dobrać samemu.
 |
| Lychee Slicer resin settings for 50um (0,05mm). |
 |
| Lychee Slicer resin settings for 30um (0,03mm). |
Layer Thickness (um) | Layer Thickness (mm) |
0,50 | 0,05 |
0,30 | 0,03 |
4. DOWNLOAD CALIBRATION STL
Probably the best free STL file for calibration can be found on the TableFlip Foundry website. Download it to your computer from the place I marked in red in the screenshot below.
Chyba najlepszy, darmowy plik STL do kalibracji, można znaleźć na stronie TableFlip Foundry Pobierz go na dysk komputera z miejsca, które zaznaczyłem na czerwono na poniższym zrzucie ekranu.

5. PRINT CALIBRATION STL
According to ELEGOO recommendations, the optimal printing environment temperature is 25-30 ℃. I have printed calibration model in my room with 21 ℃. Temperature is very important! Load the downloaded STL calibration file (The Cones of Calibration-TableFlip Foundry.stl) into Lychee. Select the resin settings at the beginning for a layer with a thickness of 0.05mm and export to the .obj format. Save the file to the flash drive attached to the printer.
Zgodnie z zaleceniami ELEGOO optymalna temperatura otoczenia w czasie druku to 25-30℃. Wydrukowałem model kalibracyjny w moim pokoju przy 21 ℃. Temperatura jest bardzo ważna! Załaduj pobrany plik kalibracyjny STL (The Cones of Calibration-TableFlip Foundry.stl) do programu Lychee. Wybierz ustawienia żywicy na początek dla warstwy o grubości 0,05mm i wykonaj export do formatu .obj. Zapisz plik na pendrive dołączonym do drukarki.
 |
| Lychee - Export slices to file. |
Place the flash drive in the printer and start printing. Wait patiently.
Umieść pendrive w drukarce i rozpocznij wydruk. Cierpliwie czekaj.

In the downloaded archive, apart from the STL file, you will also find a PDF explaining what the calibration is and what effect we expect after printing. The following screenshot from the manual explains how each page of the printed element should look like in the case of correct calibration.
W pobranym archiwum poza plikiem STL znajdziesz również PDF wyjaśniający na czym polega kalibracja i jakiego efektu po wydruku oczekujemy. Poniższy zrzut ekranu z instrukcji wyjaśnia jak powinna wyglądać każda strona wydrukowanego elementu w przypadku poprawnej kalibracji.
 |
| Screenshot from PDF attached to The Cones of Calibration - TableFlip Foundry. |
The photos below show that for a layer of 0.05mm and Exposure Time of 2.5s I got an almost satisfactory result. I did not print any more samples. I just changed and saved the resin settings reducing Exposure Time to 2.4s in Lychee software.
Poniższe zdjęcia pokazują, że dla warstwy 0,05mm przy Exposure Time 2,5s uzyskałem prawie zadowalający wynik. Nie drukowałem już kolejnej próbki. Zmieniłem tylko i zapisałem ustawienia żywicy zmniejszając Exposure Time do 2,4s w programie Lychee.
 |
| Success side |
 |
| Failure side |
Below you can see subsequent calibration results for a layer thickness of 0.03mm. Here I had to make several prints by changing the Exposure Time by setting 2s, 1.6s, 1.4s, 1.2s for the FAILURE page. The SUCES site was always ok.
Poniżej widzicie kolejne wyniki kalibracji dla grubości warstwy 0,03mm. Tutaj musiałem dokonać kilka wydruków zmieniając Exposure Time ustawiając kolejno 2s, 1,6s, 1,4s, 1,2s dla strony FAILURE. Strona SUCESS była zawsze ok.
 |
| Success side |
The 1.2s printout turned out to be an abnormal result according to the instruction. So I saved the resin settings with Exposure Time 1.3s and finished the calibration.
Wydruk z 1,2s okazał się już zgodnie z instrukcją anormalnym wynikiem. Zapisałem więc ustawienia żywicy z Exposure Time 1,3s i zakończyłem kalibracje.

 |
| Failure side |
6. PRINT TEST
Now we can print the first test model. Carry out the first print according to the manufacturer's instructions.
Teraz możemy wydrukować pierwszy, testowy model. Przeprowadźcie pierwszy wydruk zgodnie z instrukcją producenta.

We can use the model uploaded to pendrive delivered with the printer. For us, however, the figurine will be the most interesting. For this we can use the free model from LootStudios. I chose the "Adventurer" figure in 32mm scale because it has an incredibly large amount of small details. It will be perfect for the test.
Możemy użyć dołączonego na pendrive z drukarką modelu. Dla nas najbardziej intersująca będzie jednak figurka. W tym celu możemy użyć darmowego modelu od LootStudios. Wybrałem figurkę "Adventurer" w skali 32mm ponieważ ma niesamowicie dużą ilość drobnych detali. Będzie idealnie nadawała się do testu.
 |
| First test print - "Adventurer" from LootStudios |
After removing the supports, washing and curing the model, we can look at the quality of the print. If everything is OK, the calibration was successful. If there are visible artifacts, lack of details, transitions between layers, the printer must be calibrated more precisely by returning to points 3 and 4 of this procedure.
Po usunięciu podpór, umyciu i utwardzeniu modelu możemy przyjrzeć się jakiej jakości jest wydruk. Jeśli wszystko jest OK to kalibracja przebiegła pomyślnie. Jeśli widoczne są artefakty, brak detali, przejścia między warstwami to musimy dokładniej skalibrować drukarkę wracając do punktu 3 i 4 tej procedury.
 |
| First test print - "Adventurer" from LootStudios. |
As always, I welcome your feedback in the comments below. Will update this post if you have any suggestions or comments. As I mentioned at the beginning, this is the beginning of my adventure with 3D printing.
Jak zawsze czekam na Wasze wszelkie uwagi w komentarzach poniżej. Zaktualizuje ten wpis jeśli macie jakieś sugestie i uwagi. Tak jak wspomniałem na wstępie, to jest mój początek przygody z wydrukiem 3D.
Have fun painting,
Michał "ARBAL" Walczak