
How to make a 3D printed labels for bases?
At the beginning of 2015 I published a guide How to make a simple labels for bases? I think it's still a great and simple idea to make nice looking labels. It can also be modified in many ways. Years later, however, it turned out that this method has disadvantages that may arise under certain circumstances. You can read more about it in my penultimate post on this blog The destructive power of time... However, the world has moved on and now we have 3D printers. In this tutorial, I will show you a new method of making very effective labels for miniature bases in a simple way.
Please remember that all of this I give you for free. It would be so nice if you leave a mark in the form of comment and share this "HOW TO" to your friends. If you want to buy me a coffee or a beer the "DONATE" button is below.
Pamiętajcie, że wszystko to daję Wam całkowicie za darmo. Będzie mi więc miło jeśli pozostawicie po sobie ślad w postaci komentarza i udostępnicie ten "HOW TO" znajomym. Jeśli chcecie postawić mi kawę lub piwo przycisk "DONATE" znajduje się poniżej.
The following guide will probably not be anything revealing for many of you. I am sure many of you have had a 3D printer longer than me and have much more experience in this topic. The print itself was made by my friend Piotr. So take into account that the following method does not require too much skill. Treat this article as a "good idea" rather than a "super innovative" method of making labels for bases :)
Poniższy poradnik dla wielu z Was nie będzie zapewne niczym odkrywczym. Jestem pewien, że wielu z Was posiada drukarkę 3D dłużej niż ja i ma znacznie większe doświadczenie w tym temacie. Sam wydruk wykonał zresztą mój kolega Piotr. Weźcie zatem pod uwagę, że poniższa metoda ni wymaga zbyt wielkich umiejętności. Potraktujcie ten artykuł raczej jako "dobry pomysł" niż jako "super innowacyjną" metodę na wykonanie plakietek :)
Pierwsza wersję poradnika na temat tworzenia plakietek na podstawki możecie znaleźć tutaj:
We need:
Potrzebujemy:
- 3D resin printer
- computer
- 3D software
- sandpaper
- paints
- super glue
Potrzebujemy:
- drukarka żywiczna 3D
- komputer
- oprogramowanie 3D
- papier ścierny
- farby
- super glue
First, we need to carefully select the dimensions of our label in relation to the base we used for our model.
Najpierw musimy dokładnie dobrać wymiary naszej plakietki w stosunku do podstawki jakiej użyliśmy dla naszego modelu.

The first thing we need to do is design our labels. For this purpose, I used the free PrusaSlicer software. The software allows you to use the fonts that you have installed on your operating system. And this was crucial for me because I wanted to use the same fonts that I used a few years ago on traditionally printed labels.
Pierwszą rzeczą jaką musimy zrobić to zaprojektować nasze plakietki. W tym celu użyłem darmowego programu PrusaSlicer. Oprogramowanie umożliwia użycie czcionek, które macie zainstalowane w systemie operacyjnym. I to było dla mnie kluczowe ponieważ chciałem użyć tych samych czcionek, jakie stosowałem kilka lat temu na drukowanych tradycyjną drukarka plakietkach.
 |
| PrusaSlicer with my project. |
Now all you have to do is print our project on a 3D resin printer. I will not go into the printing process itself in this guide. I used protruding letters in this project, but you could also make a version with concave letters.
Teraz wystarczy już tylko wydrukować nasz projekt na drukarce żywicznej 3D. Nie będę w tym poradniku zagłębiał się w sam proces wydruku. Zastosowałem w tym projekcie wystające literki ale można by wykonać również wersję z literkami wklęsłymi.
 |
| Fresh print... |

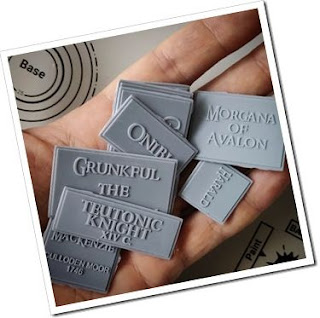
After hardening and washing the print, we can check on the base whether the dimensions are correct.
Po utwardzeniu i umyciu wydruku możemy sprawdzić na podstawce czy wymiary są prawidłowe.

The great advantage of labels printed from resin is that after heating them in hot water (or a hair dryer), we can adapt (bend) them to round bases.
Ogromną zaletą plakietek wydrukowanych z żywicy jest to, iż po ogrzaniu ich w gorącej wodzie (lub suszarką do włosów) możemy je dostosować (wygiąć) do okrągłych podstawek.

However, be careful when bending the badges because they can break! It all depends on what resin you used for printing and how strong you heated it.
Uważajcie jednak przy wyginaniu plakietek ponieważ mogą pęknąć! Wszystko zależy od tego jakiej użyliście żywicy do wydruku i jak mocna ja rozgrzaliście.
 |
| Unsuccessful bending of the resin label. |
 |
| Unsuccessful bending of the resin label. |
Printed badges may have uneven edges.
Wydrukowane plakietki mogą mieć nierówne brzegi.

We can use sandpaper to smooth the edges of the badges.
Możemy użyć papieru ściernego aby wyrównać brzegi plakietek.

Then, as in the case of figurines, it is worth washing the prints with soap and water. In this way, we will get rid of any dirt and grease from touching with hands.
Następnie tak samo jak w przypadku figurek, warto jest umyć wydruki woda z mydłem. W ten sposób pozbędziemy się wszelkich zabrudzeń i tłuszczu od dotykania rękoma.

I painted the labels black with Vallejo Acrylic-Polyurethane Surface Primer 73.602 using an airbrush. I chose this primer because it is completely matte after drying.
Plakietki pomalowałem na czarno podkładem Vallejo Acrylic-Polyurethane Surface Primer 73.602 przy użyciu aerografu. Wybrałem ten podkład ponieważ jest całkowicie matowy po wyschnięciu.


Now it is ready to paint the protruding letters and the border. Contrary to appearances, it is not difficult. You just need to add the color of the letters accordingly. I don't think they stand out too much. The point is that the viewer's eyes should not focus on the label, but on the figurine as the most important element. You can see sample colors below. In my opinion, the white color is too contrasting. But covered with a thin layer of black wash, it looks much better. The most beautiful color for me, however, is gold in combination with a black background. However, this is a very individual matter. I glued the labels to the base using super glue.
Teraz wystarczy pomalować wystające literki oraz obramowanie. W brew pozorom nie jest to trudne. Musicie tylko odpowiednio dodać kolor literek. Moim zdaniem nie mogą one zbytnio się wyróżniać. Chodzi o to aby wzrok widza nie skupiał się na plakietce ale na figurce jako najważniejszym elemencie.
Poniżej możecie zobaczyć przykładowe kolory. Moim zdaniem biały kolor jest zbyt kontrastowy. Ale pokryty cienką warstwą czarnego washa wygląda już znacznie lepiej. Najładniejszy jest dla mnie jednak kolor złoty w połączeniu z czarnym tłem. Jest to jednak kwestia bardzo indywidualna. Plakietki przykleiłem do podstawki przy pomocy kleju typu super glue.
 |
| White color. |
 |
| Vallejo Old Gold color. |
 |
| White color + black wash. |
Below I made some photos for you comparing some old labels that have been destroyed by time and replaced with new 3D prints. In my opinion, the effect is much better, but I leave it to you to judge :)
Poniżej wykonałem dla Was kilka zdjęć porównujących niektóre stare plakietki, które uległy zniszczeniu zastąpione nowymi wydrukami 3D. Moim zdaniem efekt jest znacznie lepszy ale to już pozostawiam do oceny Wam :)
 |
| Old Gold color. |
 |
| White color. |
 |
| White color vs white+black wash. |
 |
| Old Gold color. |
 |
| Old Gold color. |
At the very end of this guide, one example of a base without a label paired with a base with a 3D printed label. I think that you can see here very well how important the labelss on the base are. It's a cherry on the cake or a dot on the i :)
Na sam koniec tego poradnika jeden przykład podstawki bez plakietki zestawionej z podstawką z plakietką 3D. Myślę, że widać tutaj bardzo dobrze jak istotnym elementem są plakietki na podstawce. Jest to taka wisienka na torcie czy kropka na i :)
 |
| White color vs white+black wash. |
Another method is to print individual letters without a label. This works perfectly on round pedestals. However, this requires greater precision when gluing the letters to the base.
Inną metodą jest wydrukowanie pojedyńczych literek bez plakietki. Sprawdza się to idealnie na okrągłych piedestałach. Wymaga to jednak większej precyzji w czasie przyklejania literek do podstawki.
 |
| Not cleaned print on printer build plate. |

We paint letters in the same way as badges.
Literki malujemy w taki sam sposób jak plakietki.

Simple, isn't it?
Prawda, że proste?
Have fun painting,
Michał "ARBAL" Walczak